Comment Your Questions in Related Category

How to restore files and software using Time Machine backup on Mac ?


How to restore files and software using Time Machine backup on Mac

Apple introduced Time Machine together with Mac OS X Leopard. This software creates a backup of the Mac operating system including all files and folders, system preferences, installed applications, and others. The tool should be enabled on all Mac computers, since it is one of the easiest ways to protect your data in case of operating system or internal storage failure or corruption. Furthermore, Time Machine's backup is a useful option if you need to replace the hard disk. This software can also help to transfer data between separate Mac computers. Apple's Time Machine stores the backup data on an external storage device, and works with all possible connections, including USB, FireWire, Thunderbolt. It also supports Apple's Time Capsule and backup disks connected through a network.

This application takes periodic snapshots of all data and applications and stores them on external device. The snapshots are taken hourly, daily, and weekly. This could consume a lot of storage space, however, when disks are running low, Time Machine automatically removes the oldest backup files and replaces them with most recent. Furthermore, this application always leaves around 20% free space available. One of the biggest advantages of this software is the ability to restore specific, relevant missing files. In this way, there is no need to restore the entire operating system as is the case with various disk clone software. Additionally, if you are using an Apple laptop running on OS X Yosemite or later, Time Machine provides another feature called Local Snapshots, which creates a backup on internal storage while the Time Machine drive is disconnected. This article describes methods to restore files from Time Machine snapshots and a complete system backup.


Table of Contents:
Introduction
Recover corrupted or missing files via Time Machine backup
Reach backups without connected Time Machine's storage
Transfer files using Time Machine backup
Restore operating system from Time Machine's backup
Boot your Mac from the Time Machine backup


Download Computer Malware Repair Tool

It is recommended to run a free scan with Malwarebytes - a tool to detect malware and fix computer errors. You will need to purchase the full version to remove infections and eliminate computer errors. Free trial available.


Recover corrupted or missing files via Time Machine backup

If you have enabled the Time Machine application, you can restore all files. This function can save time if a file modification resulted in an unexpected error or accidentally saved over important information. Time Machine stores the current version of all data when the snapshot was taken. To reach files saved within snapshots, first launch the Time Machine application by using Spotlight. Press the keyboard shortcut of Command and Spacebar and type Time Machine. Alternatively, go to the Applications folder via Finder to launch the Time Machine application. Here, you can browse through the list of backups sorted from oldest to newest by clicking the up and down arrows on the screen. When you find the file you are looking for, select and press Spacebar to preview. When you are sure this is the correct file, click the Restore button. If you cannot see the snapshot, click on the Cloud icon to download the current snapshot. You can reach and restore files from that particular snapshot, even if Time Machine's external storage is not connected to your computer. If you are seeking specific information from a text-based file, simply select and use copy/paste function to select only the required lines.


[Back to Table of Contents]
Reach backups without connected Time Machine storage

You might encounter a situation whereby you are not able to connect the external storage used for Time Machine backups. Fortunately, Time Machine can recover this situation. When you launch the Time Machine application, you can access the last backup snapshot without the connected storage device. You can restore any file from a particular snapshot - this might be useful if the external storage is not available, in a different location, etc.

[Back to Table of Contents]
Transfer files using Time Machine backup

As mentioned above, Time Machine's backups are useful in various situations. Although you can restore earlier versions of your files or perform a complete system restore, it may be useful to transfer your data from one Mac computer to another. For example, if your old Mac is not working and you wish to set up a new machine, external storage with Time Machine backups is a very effective way to restore your favorite applications, calendar events, etc. If both computers are still working, consider using the Migration Assistant tool, which transfers data between two Macs automatically. Furthermore, this tool also works with Time Machine backups. In you wish to retain the latest version of the operating system but require the data from your old computer, the Migration Assistant will add all content from Time Machine backups to your new Mac.
To transfer content from a backup using this application, first connect your external storage with Time Machine's backup.
Then launch it using Spotlight. Simply press the keyboard shortcut of Command and Spacebar and type Migration Assistant. Alternatively, launch Finder and go to the Utilities folder under Applications.
When the application starts, click Continue, select to transfer data from Time Machine backup, and then click continue . You may be prompted to enter a password to confirm your actions. Enter your account password. A list with all existing backups in chronological order will pop up.
Choose the most recent (or other option) and click Continue. The tool will begin to copy your data. Depending on size of backup and speed of both external storage and internal hard disks, this process may take from a few minutes up to several hours to complete.


[Back to Table of Contents]
Restore operating system from Time Machine backup

If you wish to completely restore your operating system from a backup, you must enter macOS Recovery. This is one of the easiest ways to revert the operating system to an earlier version. It might also be an efficient solution when your computer software is struggling. In addition, restoring the whole operating system will help if your computer becomes infected with a virus or malware. To access the Recovery menu, connect your external storage (containing the backup files) and shutdown the Mac. Start it up, and after the startup chime, press and hold down Command and R. Keep holding these keys until the Apple logo appears. Release them and wait until the macOS Utilities pop-up window appears. From the list of options, choose Restore from Time Machine backup and click Continue. Select the volume containing your backup file and then select the backup file by checking the date, time, and macOS version. When the process completes, the Mac will restart automatically.


[Back to Table of Contents]
Boot your Mac from the Time Machine backup

Starting your computer from the Time Machine backup is useful when trying to troubleshot computer problems. If you are not sure if your operating system is struggling, test it by booting your computer from Time Machine backup: shut down the computer, hold down the Option (Alt) key to enter the Startup Manager screen, and then choose EFI boot as your startup disk.


(Back to Top)

How to fix " the safari can't establish a secure connection to server "


How to fix " the safari can't establish a secure connection to se


After browsing the Internet for some time, the Safari browser might stop loading certain websites. We receive many reports from Mac users stating that they encounter the "a secure connection could not be established" error message when using Safari and Chrome Internet browsers. Experienced Mac users often attempt to solve the issue, but are unsuccessful. Cleaning browsing data, cache, permissions, and resetting network settings usually resolves various browser related issues, but these methods do not eliminate the "a secure connection could not be established" error message.

For everyday users and experienced Mac users alike, this problem can be frustrating, but fortunately, having analysed users' reports and suggestions, we have a number of solutions. Note that there might be several causes of this error message. The easiest way to find a solution is to try all methods mentioned in this guide - these should eliminate the "a secure connection could not be established" error message.


Table of Contents:
Introduction
Manage your DNS settings
Weak website's encryption
Adjust your Antivirus Web Shield feature
Try disabling IPv6
Video Showing how to solve Safari can't establish secure connection to server issue


Download Computer Malware Repair Tool

It is recommended to run a free scan with Malwarebytes - a tool to detect malware and fix computer errors. You will need to purchase the full version to remove infections and eliminate computer errors. Free trial available.


Manage your DNS settings

DNS server entries might cause this problem. Google suggests that you to use their 'open entries' to ensure your connection is secure. To manage DNS settings, open System Preferences and choose Network. Click the Advanced button and select the DNS tab, remove all existing entries by selecting them and clicking minus(-). Then click the add (+) button and type 8.8.8.8, repeat the process and type 8.8.4.4. Restart the browser and check if the problem is solved.


[Back to Table of Contents]
Weak website's encryption

Apple has improved protection of their products, and as a result, block websites that contain weak encryption (websites that do not apply safety certificates that approve a webpage's encryption). Also, Safari might block a server if it detects that the connection route is through any proxy servers. Security improvements appeared with OS version 10.10.4 and iOS version 8.4 - from these versions, Safari began to block weak encryption websites. If your issue is caused by a missing or incorrect certificates problem, attempt to open the website through another browser such as Mozilla FireFox or Google Chrome. Quite often, Facebook and Twitter are interpreted as threats. Once the alternative browser loads the website, you will see a small green lock next to the URL address. Click the lock, and in the new pop-up window, click the more information button. In the new window, select the security tab, which is last option at the bottom. Under the security tab, click the show certificate button, and then switch tab to Details, which is at the top of the new pop-up window.


In the window, you will find all information required, including the title of the company providing the certificate. The next step is to run Keychain on the Mac. Use Spotlight by clicking the keyboard shortcut, Command and Spacebar. Then type Keychain. You can also go to the Utilities folder, which is under Applications through Finder. Here, you will find the Keychain application.


Once the app has launched, select the system roots to see a list of all certificates. Search for the one being blocked by Safari, double click it, expand the Trust option, and select System's defaults. Changing this option usually solves the certificate problems caused by a locked mail server. This also prevents other websites attempting to use this particular server.


[Back to Table of Contents]
Adjust your Antivirus Web Shield feature

Anti-virus software is developed to protect our computers and content from all possible threats. Since it is an automatic process, small mistakes and mismatches might be flagged as suspicious. Developers includes a feature called Web Shield that blocks suspicious websites without indicating what caused the blocked content. So users are often frustrated by unknown issues. If the methods listed above did not solve the issue, check your anti-virus software and if there is a Web Shield feature enabled, try to disable it and relaunch Safari. Check if the problem is resolved. The method to disable the Web Shield feature will depend on the software you are using.

[Back to Table of Contents]
Try disabling IPv6

Additionally, if none of the above steps solve the problem, there is one final option to try. If possible, attempt to use another Wi-Fi network and check if you are able to visit same pages without any restrictions. If all websites load correctly, try to disable IPv6 on the router (if it provides this option). Then, open Mac System Preferences and choose Network. Select your network and click Advanced. Select the TCP/IP tab. In the drop-down menu beside Configure IPv6, select Manually. In the case where Safari cannot establish a secure connection, this should solve the issue.


[Back to Table of Contents

How to control automatic update on window 10

How to control automatic update on window 10


You've surely often heard that keeping your operating system up-to-date is good for your security and it's actually true. However, there are people who could have valid reasons for wanting to hold off on an update. Unfortunately, Microsoft has decided to prevent all Windows 10 users from disabling the automatic updates. Since I hate it when people restrict my freedoms, here's how you can work around this restriction and control the automatic updates in Windows 10.


Disabling Windows 10 updates

Even though Microsoft has made it harder to this, there are still a couple of tricks that you can use to prevent your operating system from updating:

Windows 10 Home users can lie to their operating system, telling it that they're on a metered network. Since Microsoft doesn't want its users to have issues with their data caps, this will prevent the automatic download of updates. To do this, go to Start --> Settings --> Network & Internet --> Change connection properties and move the slider for the Metered connection to the On position. Now, click on the Set a data limit to help control data usage on this network button that's right under the slider and make sure the Background Data category has the Never box checked. Repeat the process for all the networks that you use (both WiFi and Ethernet) and you should be good to go.


Windows 10 Professional, Enterprise or Education users have an even more elegant way to stop the automatic updates. Open the Run box by pressing Win+R on your keyboard, then type gpedit.msc and hit Enter. This will open the group policy window and, from there, go to Computer Configuration --> Administrative Templates --> Windows components --> Windows update --> Defer updates. Click on the Select when Feature Updates are received option, choose Enabled in the respective dialog box, then select for how many days you would like to delay the update and click Apply. Now, do the same for the Select when Quality Updates are received option and you're done. Unfortunately, this solution will only allow you to stop updates for a maximum of approximately 35 days (depending on the update).


Controlling Windows 10 Updates

To gain full control over the automatic updates without actually disabling them, you're going to need to play around with the System Registry Editor. Even though if you follow my instructions to the letter, you should be fine, I still recommend creating a backup point for your operating system just to be on the safe side.


Now, press Win+R, type regedit in the Run box and hit Enter. Go to Computer --> HKEY_LOCAL_MACHINE --> SOFTWARE --> Policies --> Microsoft --> Windows. Right-click the Windows entry, then hover the New option and click on Key. Type WindowsUpdate as the name of the newly created key, press Enter, then right-click it and create another new key within it named AU. Now, select the AU key, right-click it, go to New, but this time select DWORD (32-bit) Value. Name this one AuOptions, press Enter and double-click it. Finally, replace the value data with the digit that corresponds to your choice:
2 - Notify before downloading and auto-installing the update;
3 - Download automatically, then notify for installation;
4 - Download automatically and schedule the installtion;
5 - Allow local admin to decide.

After you've entered the digit that corresponds the option you want to use, press OK and you're done.

How to create a font easily ( with picture ) tips and tricks !

How to create a font ( with picture


Downloading the Template


1
Go to https://www.calligraphr.com/ in your browser. This is the website for Calligraphr. Here you will need to create an account.


2
Create a free account. You don't need to pay to use Calligraphr, but you do need to create an account using your email address and a password. To do so:
Click Get started free at the top of the page.
Enter your email address in the "Email" field.
Enter a password in the "Password" field.
Re-enter the password in the "Password confirmation" field.
Check the "I agree to the Terms and Conditions" box.
Click SUBMIT


3
Confirm your email address. Open the inbox for the email address that you used to create your account, then open the email from "Calligraphr" and click the link in the email's body. This will take you back to the Calligraphr main page.
If you don't see the email marked "Confirm your account" from Calligraphr, check the Spam or Junk folder in your email.


4
Click START APP. It's a purple button in the upper-right side of the page.


5
Click TEMPLATES. This heading is in the upper-left side of the page.


6
Select a language preset. Click one of the options on the left side of the page, then make sure that you like the preset by reviewing it in the middle of the page.
The free version of Calligraphr allows for up to 75 characters. If you choose Minimal English, you'll be able to create the whole alphabet and some special characters.


7
Click Download Template. It's in the upper-right corner of the page.


8
Click the checkboxes next to "PNG" and "Characters as background" boxes. These options will both ensure that your template is downloaded in the correct format.


9
Click DOWNLOAD. It's in the bottom-right corner of the window.


10
Click the download link. This link is to the right of the "Download your template" line at the top of the window. The template will download onto your computer; when it finishes downloading, you can proceed with editing it.
If clicking the download link opens the template in a new window or tab, open the window or tab and right-click the template image. Click Save as. Then select a folder on your computer, and click Save.
If you don't want to edit your font using your computer's software, you can print the template, draw the font by hand using a Sharpie, and then scan the font back into your computer as a PNG file later.


Editing the Template on Windows


1
Unzip the template's folder. Skip this step if your template downloaded as a single PNG file. To unzip the folder, double-click it, then do the following:
Click the Extract tab.
Click Extract all
Click Extract


2
Select the template. Click the template that you want to edit to do so.
If you downloaded a folder with multiple templates, you might want to open the selected template to make sure that it's the right one before you proceed.
The "Template 1" option is usually the A-Z, 0-9 template.


3
Click the Home tab. It's in the upper-left side of the window. A toolbar will appear near the top of the window.


4
Click the Open drop-down arrow. This downward-facing arrow
is to the right of the Open button in the "Open" section of the toolbar. A drop-down menu will appear.


5
Click an image editing program and click Ok. Select any image editing program you have installed on your computer and click Ok to open the template in an image editing program of your choice. You can use MS Paint, Paint 3D, Photoshop, GIMP, Adobe Illustrator, Inkscape, Coral Draw, or another program.


6
Draw each character within the labeled boxes. Use the pen, pencil, or brush tool of your image editing software to draw your own characters over the characters in the template. Try to make each character about the same size as the characters in the template.
If you have a stylus and a pad, use them instead of the mouse. You may have to open your template in a different program to do so.
In most image editing programs, you can undo a mistake by pressing Ctrl+Z.
If you are using a program that supports multiple layers, it is recommended that you draw your characters on a separate layer from the template.


7
Save the character sheet as a PNG image. Use the following steps to save the character sheet in PNG format:
Click File.
Click Save As (Export in some image editing programs).
Select PNG next to "Format" or "Save as type".
Type a file name for the character sheet next to "File name".
Click Save.
Creating Your Font

1
Go to https://www.calligraphr.com/ in your browser. This is the same site you downloaded the template from.
If you are not automatically logged in, log in with the username and password you used to set up your account in Method 1.


2
Click START APP. It's in the top-right side of the page.


3
Click MY FONTS. You'll find this option in the upper-left side of the page.


4
Click Upload Template. It's at the top of the page. A new window will open.


5
Click Choose File. This option is in the middle of the window.


6
Select the character sheet you made from the template. Locate the character sheet file containing your font characters.


7
Click Open. It's in the bottom-right side of the window. Doing so uploads the file.


8
Click UPLOAD TEMPLATE. This option is at the bottom of the window. Your file will be added to your Calligraphr page.


9
Scroll down and click ADD CHARACTERS TO YOUR FONT. It's in the bottom-right side of the page. This displays a preview of what your font will look like.


10
Click Build Font. This tab is at the top of the page. Another window will appear.


11
Enter a name for your font. In the "Font name" text field, replace "MyFont" with whatever you want to name your font.
The name that you choose here will be the name that shows up when you use the font in places like Microsoft Word.


12
Click BUILD. It's in the lower-right corner of the window. Doing so creates your font.


13
Click one of the "Font files" download links. You'll see a link ending in ".ttf" and a link ending in ".otf" below the "Font files" heading; if you don't know the difference, click the .ttf file. The font file will download onto your computer, from which point you can install the font on your computer by doing the following:
Windows - Double-click the font file, then click Install at the top of the resulting window.
Mac - Double-click the font file, then click Install at the bottom of the window.

How to Make your cover design of your software easily !

How to Make your cover design of your software easily !


It's somewhat unfortunate that the first thing a potential reader sees when they come across our book is not the writing itself (not even the blurb!)

 But our book's front cover. After all, it's the one part of our book that we (often) didn't have a hand in creating! Though hopefully connected to the characters, story or theme of our book in some way, the cover's main purpose is to convince a potential reader to pick up our book in the first place - in some ways, it's a form of marketing in itself.


And that makes a good book cover something of a necessity. Most writers will need to purchase one, as it's not often that an author also has graphic design experience on their resume (let alone experience knowing what does or doesn't work on a book cover, or the objectivity to separate themselves from the design process ). But with some book cover designs setting an author back between $ 150 and $ 500, and with cheaper options (Fiverr, for example) not always providing great value for money, sometimes an author needs to put their own cover together (for the time being, at least).


But how do you even go about doing that? Or creating any of the other visual assets your book might require (3D mockups for your website, images for Facebook ads, etc.)? There are numerous pieces of software available - from the obvious and (sort of) expensive to the obscure and free. Here are just a few of the main ones.
Photoshop

Perhaps the software that most people will think of when it comes to graphic design, Photoshop is probably the “best” piece of kit when it comes to designing a book cover. In fact, this is what Stuart Bache (cover designer for Mark Dawson and Stephen King, to name just a couple) uses in his Cover Design for Authors course. To follow along with his techniques and methods, it’s definitely beneficial to utilise the same piece of software (the methods are largely the same across other softwares, but believe me: they’re not always so intuitive).


Photoshop is great for creating pretty much anything, particularly if coupled with other apps in the Adobe Creative Cloud suite (though to design book covers, ad images, etc., you’d only need Photoshop). It’s not particularly hard to use, either – which might come as a surprise, given that it’s basically the industry standard (of course, making a book cover is on the “easier” end of the graphic design spectrum). You can manipulate images, cut parts of them out, merge things together, and use fonts – creating everything from flat text to bulky, metallic signs. It’s also the best for creating 3D mockups, in my opinion. Because it allows for ‘smart objects’, you can add your book’s cover to an existing 3D template by doing nothing more than double clicking on the template’s cover, then dropping your own cover onto the template.


There used to be a bit of a barrier to entry - Photoshop used to cost an arm and a leg (it is professional software, after all). But now Adobe has moved to a subscription model for their applications, and Photoshop CC 2019 can be licensed for only £ 9.99 a month. There is a cheaper alternative with a one-off payment, however.
Affinity Photo


If you don’t have Photoshop, Affinity Photo may be the next best thing. It has pretty much all the same features as Photoshop, and, if you get good enough at it, you can achieve much the same results. There are only two downsides, from my experience: it’s harder to get to grips with at first if you’re used to Photoshop, and it doesn’t allow for ‘smart objects’. This means that creating a 3D mockup of your book can be pretty difficult – you can still create a 3D image yourself, but that’s a lot more work than just swapping out a template’s cover image for your own.


On the plus side, it’s a lot cheaper in the long run. It’s normally £48.99, but there are regular sales which bring it down to £38.99. They also sell a book on how to make the most of the software, and that’s often under £30 itself. That’s a one-off costs, remember: if you use it for 4 months, you’re already saving yourself more money than you would with Photoshop.
GIMP


Stop sniggering. GIMP stands for GNU Image Manipulation Program. It’s a cross-platform image editor available for Linux, Mac OS X and Windows. More importantly, it’s entirely free; you can change the source code and even distribute your ‘updated’ version afterwards. That means loads of people have developed plugins which you can utilise (also for free). It’s a very professional bit of kit, but I’ve heard that it’s not the most intuitive to use – given that it’s open source and not as commercial as the other options, you might find it harder to discover tutorials on YouTube.


All that said, it's a comprehensive piece of graphic design software, and unlike the previous two options, it's completely free.
Canva


Here's another completely free option. Canva is possibly the easiest to use if you're new to graphic design, but it's also by far the most limiting. You can upload your own images, but there's only so much editing you can do to them - it's more like applying an Instagram filter than proper graphic design. That being said, it's simple to add text and put together Facebook ads - if you're looking for something quick, easy-to-use and functional, then Canva will do the job.


Ultimately, the best choice is to go with a professional who will ensure that your cover not only looks good, but fits its purpose: attracting the right readers to your book. But if investing in a professionally-designed cover isn't an option, then you're going to need the tools to get as close as you can yourself. In that case, a lot of practice using Photoshop is probably the best way forward, with Canva being the easy choice if money isn't an option.

How to be a professional blogger ? Best tips !

How to be a professional blogger ?               Best tips !                                                            


Blogging can be a highly fulfilling profession regardless of your niche. Even so, it can be hard to figure out how to get started as a professional blogger, particularly because there are so many different ways to take the plunge.

However, when you break it down, there are three primary paths towards becoming a professional blogger. Weighing up the pros and cons of each can help you decide which is the best for your situation and overall goals.


In this post, we’ll explain what it means to be a ‘professional’ in the blogging industry. Then we’ll share three routes you can take to become one yourself. Let’s dive in!


Want to become a #professional #blogger? ✍️ Here are 3 routes you can take to make a living


CLICK TO TWEET
  • What it means to be a professional blogger


Bloggers can be divided roughly into two categories: hobbyists and professionals. However, the line between them can get a little blurry as there are hobbyists who manage huge, high-traffic sites and professionals working on smaller publications.


Therefore, what makes a blogger a professional isn’t the size or even the quality of their site. Rather, professional bloggers create written online content as their primary paid occupation, rather than blogging as a pastime.


This definition excludes those who run blogs for no pay at all and those who blog on the side for small amounts of revenue to supplement their main income, regardless of the size or quality of their blogs. It also doesn’t specify that you have to have your own blog.


Accurately distinguishing between professional bloggers and hobbyists provides key insight into the industry. When you break down the definition of a professional blogger, many opportunities for making a living writing online content start to open up.
How to make a living as a professional blogger (3 routes to take)


If you’re hoping to start writing full time, it’s important to know what your options are. There are three main ways you can become a professional blogger and make enough income to live off of. We’ve explored them in depth below, so let’s take a look!
1. Start your own blog and monetize it


One possible route for becoming a professional blogger is to launch and monetize your own site. This is the route most people think of when they consider starting a blogging career.


There are many advantages to this method. Primarily, it gives you complete control over your content, your income, and your work schedule. Being your own boss can feel pretty liberating, and frees you up to pursue other interests.


This flexibility can be particularly appealing to those who wish to travel more, don’t work well under a traditional work structure and schedule, or have caregiving responsibilities. It can also be highly fulfilling, as you can focus exclusively on subjects of interest to you:


Plus, it’s pretty easy to get started. Launching a blog with a platform like WordPress is fast and accessible from a budgetary standpoint. Monetizing with ads, affiliate links, and sponsored posts may take a little more work, but is also fairly straightforward.


The main downside to starting and monetizing your own blog is that it takes time. Most blogs take months or even years to start making a significant amount of money, and that’s if you’re able to pull out all the stops when it comes to search engine optimization (SEO), web design, and other management elements.


When you’re first starting out, having your own blog requires a lot of time and energy for very little payoff. If you don’t think you can stick it out, this route may not be for you. Fortunately, there are other ways to make a living as a professional blogger.
2. Get hired by a company to write for a business blog


Believe it or not, there are people who will hire you to write their blog for them. As far as finances go, this can be the most lucrative route for professional bloggers (unless you make it big with your own blog, but it’s pretty rare).


If you’re hired by a company to write a business blog, you’ll primarily benefit from a guaranteed income. You won’t have to stress as much over traffic levels and click-through rates (CTRs) since you’ll have a paycheck coming on a regular basis (although they are still indicators of your performance as an employee).


Depending on the company you work for, you might also be entitled to benefits including health care, vacation days, and a retirement plan. These features can provide you with a peace of mind you might not have working for yourself.


For some, the drawback to blogging for a business is the lack of control over the content you’re creating. On this path, you’ll probably spend a lot more time writing marketing-focused posts than you might like:


Perhaps unsurprisingly, the competition for these positions can get pretty steep. Checking job posting sites such as Indeed regularly can help you stay on top of any new positions that become available.


If you’re planning to apply, make sure you have a portfolio of writing samples ready to go. While any piece that shows off your writing skills is useful, work demonstrating your knowledge of SEO and other aspects of digital publishing is also important.
3. Work as a freelance blogger


Freelance blogging can be a nice, middle-ground option for many. This type of professional blogger has more control over their posts, as they can pick and choose the projects they work on. They also have the flexibility that comes with self-employment, while maintaining a slightly more predictable income.


However, as a freelancer, you’ll have to source your own clients. This is often the most difficult part of becoming a professional blogger. Your income relies entirely upon your ability to find and keep a fairly large volume of high-quality clients, and it could eat into your already valuable writing time.


Again, a portfolio will be extremely beneficial to you. You’ll also need to work on your self-promotion skills and start networking with other freelancers and professionals in your niche. Creating a profile on LinkedIn may be helpful.


You can also join freelance job marketplaces, such as Upwork:


Businesses and individuals come to these sites to find freelancers for hire. Unfortunately, most freelance job marketplaces will take a portion of your earnings as compensation for promoting you – so make sure to consider this when setting your rates.
Become a professional blogger today


Becoming a professional blogger can be a fulfilling way to make a living. However, if you don’t have the time or resources to start your own blog, a career as an online content creator may feel out of reach. On the contrary, it’s absolutely achievable given the right mindset and approach.


In this post, we’ve looked at multiple ways to go about making a living as a professional blogger – three to be exact. Let’s quickly recap them: 


Start your own blog and monetize it.
Get hired by a company to write for a business blog.
Work as a freelance blogger.

Highest upto 50$ CPM giving ads network. Hilltopads !

Highest upto 50$ CPM giving ads network. Hilltopads !

CPC/CPM Pop-Under Ads


Finding a good, reliable ad network to monetize our blogs is a headache, isn’t it?

There are many well-known ad networks out there like AdSense and Media.net. And while these well-known networks are pretty good, there are many other lesser-known ad networks out there which have a greater chance of making us a lot more money.

One of these lesser-known networks is HilltopAds. In this guide, I will share a review of HilltopAds and how to get started.

If this is your first time here at ShoutMeLoud, you should know that I review many ad networks so that you can pick the one that is most suitable for your blog, your traffic level, and your niche. After reading this review of HilltopAds, you should browse ShoutMeLoud’s Make Money Online category to find more topics that will help you monetize your blog.

Now, without further delay, let’s take a look at HilltopAds.
Also check out: 5 Best CPM Ad Networks For Bloggers & Media Houses


Page Contents
HilltopAds Review: A Complete Overview Of This CPC/CPM Ad Network
How To Get Started with HilltopAds and Make Money
HilltopAds Review: A Complete Overview Of This CPC/CPM Ad Network

HilltopAds is a CPC/CPA/CPM ad network that offers various ad types.

The most popular are the pop-under ads, which are available for both mobile and desktop sites. They also have banner ads and social ads (CPA).

HilltopAds is a U.K.-based advertising network that uses a combination of smart tech and a custom approach to help businesses grow their profit, while also helping publishers/bloggers earn more money.

HilltopAds is most popular in the following niches: Gaming, Downloads, PinSubmits, Dating, Sweepstakes, Video Streaming, File Hosting, and Entertainment.

They also offer ads for all geolocations, but if you have more traffic from places like the US or the UK, you’ll make more money.


Payment Options


HilltopAds has a minimum payout requirement of only $50, which makes it well-suited for small and medium-sized publishers. The payments are made weekly, and you can use Payoneer, Bitcoin, Paxum, Webmoney, and ePayService to receive payment.

For a few payment methods, like Bitcoin, you need to have a minimum of $100 for payout. If you are a premium kind of publisher and are making more than $1000 with HilltopAds, you should opt for wire transfers as your payout method.

A few important things to know about HilltopAds:


They are most suitable for pop-under ads.
Minimum payout is $50 in most cases.
No mixed content warnings for publishers as they offer HTTPS ad tags.
Their in-house tech rejects bot traffic, click farms, malware, and viruses.
Advertisers can do advanced targeting based on country/city/language, device type, retargeting, browser/OS, keyword, time/frequency cap targeting, IP range, mobile carrier/wi-fi.
Ad network rotation and eCPM real-time optimization.
Publishers can add more than one website from the dashboard.
You can’t use HilltopAds with AdSense as AdSense is not compatible with pop-under and pop-up ads.
You can manage your account as a publisher or as an advertiser from a single dashboard.
How To Get Started with HilltopAds and Make Money

Here’s what you need to do:
Click here to create an account.
Once you are signed up, click on Manage Site & Zones.

It can take up to 3 days for getting your account approved.
Once your site is approved, click on Zone and create an ad code.
Add it to your blog and let the HilltopAds rotation do its magic.

Using HilltopAds For Your Blog

HilltopAds is a growing ad network that is becoming more popular every day.

Their anti ad-blocking technology and superoir ad targeting are what make them stand out from the crowd. Another notable thing is Net7 with a minimum payout of $50. This makes it easier for a blog with medium traffic to receive their payment quicker.

If you are someone who is looking for pop-under ads or an alternative to AdSense, HilltopAds is a great ad network to try out.

Create an account on HilltopAds

Are you using HilltopAds to run advertisements on your blog or advertise your business? Do share your HilltopAds review in the comments section below.

Here is some related content that you should check out next:

How to fix Windows Update error code 0x80244022 ?


How to fix Windows Update error code 0x80244022


Windows Update is an important service provided by Microsoft for Microsoft Windows users. Its main purpose is to deliver software updates for the Windows Operating System and associated components, including Windows Defender and other products.


There are various categories of updates, such as critical, security, quality, service packs, and definition updates. Patch Tuesday is the second Tuesday of each month, a day when Microsoft routinely releases updates, however, if there are problems that require urgent fixes, Microsoft will provide the update whenever required.


The Windows Update service is designed to fix problems, but often fails and delivers various errors. In this example, we look at Windows Update error code 0x80244022. The reason behind this error is unknown but is probably due to an issue on the Microsoft server side. There are, however, some steps that can be taken to fix the problem if it is caused by a malfunction or corruption in Windows. You might need to run the Windows Update troubleshooter, delete SoftwareDistribution folder contents, run System File Checker and DISM, edit Windows Registry, or disable the proxy server. Follow the guide below for a number of possible solutions.


Table of Contents:
Introduction
Run Windows Update troubleshooter
Delete SoftwareDistribution folder's contents
Check proxy settings
Run DISM and system file checker
Video showing how to fix Windows Update error code 0x80244022


Download Computer Malware Repair Tool


It is recommended to run a free scan with Malwarebytes - a tool to detect malware and fix computer errors. You will need to purchase the full version to remove infections and eliminate computer errors. Free trial available.


Run Windows Update troubleshooter


First, we recommend that you run Windows Update troubleshooter, a good problem solver. There are various built-in troubleshooters in Windows designed to quickly diagnose and automatically resolve various computer problems. Troubleshooters cannot fix all problems, but they are a good place to start if you encounter a problem with your computer, operating system, or connected devices. In this guide, we show how to run Windows Update troubleshooter to resolve errors that prevent you from updating Windows. You can find the troubleshooter using Windows Search. Go to Settings and type "troubleshoot" in the Windows Settings search bar. Click the "Troubleshoot" result.


Locate the Windows Update troubleshooter under "Troubleshoot" and select it. Click the "Run the troubleshooter" button. Windows will start resolving problems that prevent you from properly updating the Windows operating system. Check if the troubleshooter resolved Windows Update error code 0x80244022.


[Back to Table of Contents]
Delete SoftwareDistribution folder contents


The Software Distribution folder is a temporary folder in which Windows stores update files until they are completely downloaded. Then, Windows starts the update process. In this case, removing SoftwareDistribution folder contents and restarting the Windows Update service might resolve "Windows Update error code 0x80244022". Type "command prompt" in Search and right-click the "Command Prompt" result. Select the "Run as administrator" option from the contextual menu.


In Command Prompt, type the "net stop wuauserv" command and press Enter. Do not close the Command Prompt window.


Now go to the "C:\Windows\SoftwareDistribution" directory in Windows and select all contents. Then right-click them and select "Delete" from the contextual menu.


Return to Command Prompt, type the "net start wuauserv" command, and press Enter. Restart the computer and check if you still receive Windows Update error code 0x80244022 when trying to update Windows.


[Back to Table of Contents]
Check proxy settings


To check proxy settings, type "Internet Options" in Search and click on the result with the same name.


In the Internet Properties window, click the "Connections" tab and then click "LAN settings".


In the Local Area Network (LAN) Settings window, ensure that the "Use a proxy server for your LAN" checkbox under "Proxy server" is not ticked. Click "OK" to save these settings. Check if Windows Update error code 0x80244022 persists.


[Back to Table of Contents]
Run DISM and system file checker


First, we show how to run the Deployment Image Servicing and Management (DISM) tool, which can be used to repair and prepare Windows images, including Windows Recovery Environment, Windows Setup, and Windows PE. To run a DISM scan, open Command Prompt as administrator by typing "command prompt" in Search and right-clicking the "Command Prompt" result. Then select the "Run as administrator" option from the contextual menu.


In Command Prompt, type the "DISM /Online /Cleanup-Image /RestoreHealth" command and press Enter.


When the DISM repair process is complete, run System File Checker. We recommend that you run both the DISM and SFC scans.


System File Checker is a Windows utility that allows users to scan for corruptions in Windows system files and restore corrupted entries. To run System File Checker, open Command Prompt as administrator (if you closed it after DISM) and type the "sfc /scannow" command. Press Enter to execute it and wait for the scan and repair process to complete. Then restart the computer and check if Windows Update error code 0x80244022 persists.


If you are still unable to update Windows, there is probably an issue on the Microsoft server side and all you can do is simply wait until they fix it. If you know of other solutions to this problem, not mentioned in our guide, please share them with us by leaving a comment in the section below.

How To Fix System Restore Did Not Complete Successfully, Error 0x80070091


System Restore Did Not Complete Successfully, Error 0x80070091. How To Fix It?

The System Restore feature in Windows operating systems allows users to return to a previous computer state (to a restore point, if one was created) automatically or manually. In Windows 10, this feature is disabled by default and users must to turn it on if required. It is recommended that you have System Restore enabled.

System Restore can be very useful when there are problems with the operating system, such as system malfunctions and various other problems. Furthermore, it is invaluable when there are many changes to the system that you wish to revert (and changing them manually would be time-consuming). If specific restore points are created, you will be able to undo weeks or even months of changes. Furthermore, System Restore does not affect your personal files, and thus you can continue to use them even when the system is restored. Note, however, that programs installed after the restore point you select will be lost.

System Restore often helps to resolve problems, however, in some cases, you might receive an error when attempting to restore the system. The error usually contains information such as "System Restore did not complete successfully. Your computer's system files and settings were not changed". It might also state that System Restore failed while restoring the directory from the restore point, and that this is an unspecified error with code 0x80070091 and source AppxStaging. It also gives an option to run System Restore again and choose a different restore point. This might not be useful if you only have one restore point created or other restore points are not at required dates/times.

This problem is not new and is often indicative of problems with the WindowsApps folder or that the destination folder is not empty. I.e., a folder was required to be empty, but contained files, and thus System Restore could not be completed. You could simply delete or rename the folder, but this is not as easy as it may seem. Fortunately, you can address this problem by following the steps in the guide below.


Table of Contents:
Introduction
Rename The WindowsApps Folder In Safe Mode
Rename The WindowsApps Folder From The Windows Recovery Environment
Temporary Disable Your Antivirus
Check Your Disk For Errors
Video Showing How To Fix System Restore Error 0x80070091


Download Computer Malware Repair Tool

It is recommended to run a free scan with Malwarebytes - a tool to detect malware and fix computer errors. You will need to purchase the full version to remove infections and eliminate computer errors. Free trial available.


Rename the WindowsApps Folder in Safe Mode

Safe Mode is a diagnostic start-up mode in Windows operating systems used to obtain limited access to Windows when the operating system does not start or function normally. It is the opposite of Normal Mode, which starts Windows in the usual manner. Safe Mode starts Windows in a basic state, using a limited set of files and drivers. It can help to troubleshoot problems on your computer. If, for example, the problem does not occur in Safe Mode, this will confirm that the default settings and basic device drivers are not causing the issue. To rename the WindowsApps folder, you must use Safe Mode or the Windows Recovery Environment (WinRE). First, we demonstrate Safe Mode. To boot into Safe Mode, go to Windows Settings and click the "Update & Security" option.


Now select the "Recovery" section in the left pane and click the "Restart now" button under Advanced startup.


Your computer will restart and you will see a menu on a blue screen. Select the "Troubleshoot" option.


In the Troubleshoot menu, click "Advanced options".


In the Advanced options window, find and click "Startup Settings".


In Startup Settings, click "Restart".


You will be presented with a list of options. To choose an option, press the number on your keyboard or use function keys from F1 to F9. Press 4 or F4 on your keyboard to enable Safe Mode. If you need to enable Safe Mode with Networking, press 5.


In Safe Mode, type "command prompt" in Search and right-click the "Command Prompt" result. Select the "Run as administrator" option from the contextual menu.


Now enter the following commands, pressing Enter after each to execute:

cd C:\Program Files
takeown /f WindowsApps /r /d Y
icacls WindowsApps /grant “%USERDOMAIN%\%USERNAME%”:(F) /t
attrib WindowsApps -h
rename WindowsApps WindowsApps.old


Now restart the computer to boot into Windows normally. Try to run System Restore again and check if System Restore error 0x80070091 persists.

[Back to Table of Contents]
Rename the WindowsApps Folder From the Windows Recovery Environment

If for some reason you were unable to rename the WindowsApps folder through Safe Mode, we suggest that you attempt it through Windows Recovery Environment by following the same steps described in the previous method, and by selecting the "Command Prompt" option instead of "Startup Settings" in the Advanced options window.


Select your administrator account and enter the password. Click "Continue".


Now type the following commands and press Enter after each:

cd C:\Program Files
attrib WindowsApps -h
rename WindowsApps WindowsAppsOld


Now restart the computer to boot Windows normally and try to run System Restore again. Check if System Restore error 0x80070091 persists.

[Back to Table of Contents]
Temporary Disable your Antivirus Software

Installed and enabled antivirus software might prevent you from running the System Restore feature. To check if third-party antivirus software is the cause, temporarily disable it, try to run System Restore again, and check if the problem persists. If disabling (or uninstalling) the antivirus software resolves the problem, we recommend that you switch to other antivirus software or reinstall the currently-installed version (or simply disable it again). If you are not sure how to disable your antivirus software, read this guide in which you will find instructions on how to disable some of the most popular antivirus programs.

[Back to Table of Contents]
Check the Disk for Errors

A built-in Windows tool allows you to check the integrity of disks. It examines disks and corrects many types of common errors. It is possible that there are some errors that prevent you from running System Restore and they can be fixed using this tool. You can run this tool from the command line or through a graphical interface. In this guide, we run it through Command Prompt. Open Command Prompt as administrator, type the "chkdsk C: /f" command, and press Enter on the keyboard. Replace "C" with the letter of associated with the hard drive i(f it is not the C: drive you wish to scan or the Windows operating system resides on another drive.


You will be asked if you want to restart your computer to perform the scan. Type the "Y" letter and press Enter. Wait for the chkdsk process to finish and check if this command resolved System Restore error 0x80070091.

We hope that this guide was helpful and you were able to successfully perform a System Restore without receiving System Restore error 0x80070091. If you know of other solutions to this problem not mentioned in our guide, please share them with us by leaving a comment in the section below.

How to make a software from HTML for begineers !

How to make a software from HTML for begineers !

Whether you’re a tech-savvy web design genius or a beginner,you’ve probably realized the usefulness of having a basic familiarity with HTML. As one of the most fundamental languages for website creation, you can’t go wrong with a little HTML knowledge in your back pocket.

No matter if you know a little or a lot, there’s a tool out there that can help take your HTML skills to the next level … or at least make sure your code is correct.

That tool? An HTML editor.

Remember: With these HTML editors, you’ll want to have more than a basic understanding of HTML. These tools can help you fix mistakes, but they can’t write your code for you.

Ready? Let’s take a look at five top-rated HTML editor tools from Capterra’s software directories. What does “top-rated” mean? Each of the five tools below (presented alphabetically) have an above-average overall user rating compared to other products in the same category. Read more about our methodology here.

Jump to:

CoffeeCup HTML Editor

Komodo Edits

NetBeans

Notepad++

Visual Studio Code


Top 5 free HTML editors
1. CoffeeCup HTML Editor

CoffeeCup offers a free HTML editor, but if you’re looking for more of a WYSIWYG (what you see is what you get) setup, it offers a visual editor for an additional cost.

You can use CoffeeCup to create both HTML and CSS files, as well as to edit existing website files. CoffeeCup has an average overall rating of 4.5 stars from reviewers on Capterra.
Pros Cons
According to users, CoffeeCup’s HTML Editor has better than average customer support and is easy to use. If you’re looking for bare-bones functionality, CoffeeCup offers just the basics. Reviewers say there are no bells and whistles for the free version of this HTML editor.


Cost to upgrade: $29 will get you access to the whole suite of features offered by CoffeeCup. For an additional $15, you can get the entire program sent to you on a thumb drive.

Highly rated by: People who work in higher education report that this free HTML editor meets their needs better than the average HTML editing software solution.


CoffeeCup’s HTML editing interface (Source)


Read User Reviews of CoffeeCup


2. Komodo Edit

Open source lovers rejoice! Komodo Edit is a free multilanguage HTML editor. ActiveState’s Komodo IDE created this pared-down free version of its system, with paid licenses available for users who need advanced features.

This free HTML editor includes some robust features, such as auto-completion and debugging tools. It can also edit several other coding languages, including Python, Perl, and Node.js. Komodo has an average overall rating of 4.5 stars from reviewers on Capterra.
Pros Cons
Komodo Edit’s users say it’s very fast and easy to use. Reviewers also highlight the software’s multi-platform setup, which allows Linux, Mac, or Windows. Reviewers report that Komodo Edit’s customer service is slightly less helpful than they’d expect and wish the product offered more features and functionality.


Cost to upgrade: Starts at $7 monthly when billed annually and runs up to $499+ depending on the number of users and desired features.

Highly rated by: Users from both small and midsize businesses rate Komodo Edit highly, as do members of the IT, e-learning, and financial services industries.


Komodo IDE’s HTML editing interface (Source)


Read User Reviews of Komodo IDE


3. Apache NetBeans

A free and open source integrated development environment (IDE), Apache’s NetBeans can help you develop in HTML5, PHP, JavaScript, C++, and several other coding languages. It offers code templates and generators, as well as project management tools to help organize larger projects and teams.

NetBeans also has a large plugin marketplace, and developers are encouraged to write and share their own plugins. NetBeans was last updated in April of 2019. NetBeans has an average overall rating of 4.5 stars from reviewers on Capterra.
Pros Cons
Reviewers love that NetBeans enables them to auto-complete some codes and that it’s consistently reliable. Users noted that NetBeans’ customer service can take some time to respond when an issue is identified and that the interface appears a little dated.


Cost to upgrade: Not publicly available.

Highly rated by: Reviewers in the computer and network security and human resources industries rate NetBeans higher than average.


NetBeans HTML editor interface (Source)


Read User Reviews of NetBeans


4. Notepad++

Available only for Windows users, Notepad ++ is a free source code editor written in C++. Its user interface (UI) is completely customizable, and users can decide how syntax is highlighted and folded.

Bonus: For those trying to go green, Notepad++ is dedicated to reducing carbon emissions by creating programs that run on less CPU power. The solution was last updated in June 2019. Notepad++ has an average overall rating of 4.5 stars from reviewers on Capterra.
Pros Cons
Reviewers consistently cite a high level of functionality and report a higher-than-average ease-of-use rating. Particularly because this offering is open source, users also appreciate the consistency and timeliness of version updates. Reviewers say that Notepad++ has slightly below average customer service, and some describe its interface as a little dated.


Cost to upgrade: Not publicly available.

Highly rated by: Large business users review Notepad++ the best. Reviewers from the IT and services, computer software, and banking industries rate this solution higher than average.


Notepad++’s HTML editor interface (Source)


Read User Reviews of Notepad++


5. Visual Studio Code

If you’re looking for a robust editor, Microsoft Visual Studio’s free HTML editor edition of their IDE—which supports all the programming languages you’ll ever need—is a great choice. While their paid versions offer more advanced features, this free version includes all the essential tools needed for an HTML editor.

Plus, they throw in some useful tools for mobile app development, such as code sharing between Android and iOS. Visual Studio Code has an average overall five-star rating from reviewers on Capterra.
Pros Cons
Reviewers consistently rate Visual Studio Code highly across the bar. Users say this software has excellent customer service and offers a great range of functionality. Some users say that it’s a little more difficult to use because of the complicated commands for some configurations.


Cost to upgrade: The professional plan for teams is $45 per month.

Highly rated by: Visual Studio Code is highly rated by users in the computer software and IT services industries.


Microsoft Visual Studio Code’s HTML editing interface (Source)

How to fix perfomance problem on your samsung galaxy


Samsung's phones are powerful, but no phone is going to perfectly perform in all situations. As your Samsung phone starts to get old, a couple years in with new features and apps, you may start to see slowdowns. If your Galaxy S or Galaxy Note is slowing down from time to time, there are lots of things you can do to fix it — here are our top tips.
Restarting is the first step


Source: Android Central


Sometimes we get so focused on trying to fix a slowdown that we forget about the most basic thing ever: restarting the phone. Yes, it stinks to hear "did you turn it off and back on again?" when you feel like you've already tried things, but this is something you have to do as the first step of your performance issue troubleshooting.

Software and apps are supposed to behave themselves, but sometimes they don't — and a simple restart is all it takes. Alternatively, even if you have to continue looking at different ways to fix your problem, restarting and getting a cleaner slate to start with is very important. By restarting your phone and then diagnosing, you may at least get some of the extra cruft out of the way so you can see the real problem.

To restart, press and hold the power button (underneath the volume keys) for two seconds and tap "restart." If you happened to have turned on Bixby on that button, you can press and hold the power and volume down buttons for two seconds.
Check for battery-draining apps


Source: Android Central


Most of the time, performance issues can be tied to a misbehaving app — if not several apps. Typically if an app is causing a big enough problem to slow down your whole phone, it's also draining your battery. So looking at your battery usage may give you a clue as to where to further your search. You can find your battery usage in settings, device care, battery, and battery usage. It's best to check your battery usage at the end of the day to get the most complete information.

When you look at your battery usage for the day, no individual app should account for a large percentage of your total unless it's a high-power app that makes sense — think of a media streaming app or a 3D game, for example. Any "normal" app that you use for a relatively short period and isn't graphically intensive should be somewhere in 1-5% of your usage. If an app's using more than that, it's worth investigating further. This is doubly true if you see an app on this list that you haven't opened recently — an app that's mostly running in the background can cause problems.

On newer Samsung phones running One UI 2, the battery usage screen even lets you scrub back and see battery data from previous days, which can be useful. If you see an app with big battery drain today, you can then go back in the past week and see if this is a consistent problem or related to something you did just today.
Look at memory (RAM) usage


Source: Android Central


Following the same thinking as looking at battery usage, you can also see how much memory apps have been using. High memory usage can be indicative of a bad app, and when you have one app using a lot of your memory, it can slow everything down as the rest of the system struggles to get the memory it needs. Go to settings, device care, and memory.

You'll see a breakdown of how much memory is being used lately here, but you shouldn't be immediately alarmed. The first thing to look at is the top readout, showing how much memory you have available. If you have over 1GB available, you don't need to do anything here — resist the urge to hit the "clean now" button, please. Your phone is supposed to allocate RAM out to apps, and apps should hang onto the amount of RAM they need. So long as they aren't holding onto RAM when other apps and parts of the system need it, there isn't a problem here.

The only problems come if you see an app listed here using lots of RAM when you haven't actually used that app recently. Like the battery discussion, an app that you're not actively using shouldn't be taking up phone resources. In that case, you can force stop the app and see if the problem was a one-off or something you should investigate further. For the most part, apps will use memory properly and the phone's system will take RAM away from apps that haven't been used. Of course, there are always exceptions.
Reduce your screen resolution

Samsung's phones are known for their displays, and part of the equation is their super-high resolution. While its new phones are more than capable of running every task at the highest resolution, as the phones age and apps get more intensive there's a chance the older hardware may not be able to keep up. The higher the display resolution, the harder the processor has to work to display all of the graphics on the screen, so reducing the resolution makes its job easier, and can speed everything up.


Source: Android Central


Go into settings, display, and screen resolution to select a lower resolution. By default Samsung's phones don't even use the highest resolution — for performance and battery life reasons — but you may have turned it up before. On Samsung's modern phones, you'll probably see HD+, FHD+ and QHD+ options.

The nice thing is, on Samsung's latest displays, you really won't notice a difference in visual clarity between QHD+ and dropping down to FHD+. The displays still have good pixel density at the lower resolution, and depending on the quality of your eyesight you may not even be able to notice the difference in HD+ resolution on some phones.
Uninstall (or disable) unused apps


Source: Android Central


When you're trying to track down a slowdown you suspect is related to an app, it can feel like a wild goose chase if you have hundreds of apps installed. It can often be an app that you don't actually use, but is just installed on your phone for whatever reason. The fact that it's an unused app can make it hard to track it down as the culprit. So to simplify things, you can reduce the number of opportunities for misbehaving apps by just uninstalling ones you don't need.

Go to settings and apps to see a full list of every app on your phone. Tap on the menu button in the top-right corner, tap sort by and choose last used — this will show your least used apps at the bottom of the list. You may be surprised that some of these apps are still installed, or how long it's been since you've used them. If you're looking to cut back on your app load, this is a great place to start.

If you want to keep an app installed, but just stashed away for a later day, you can "disable" an app instead. This will keep it on your phone's storage, and retain all of its data, but will guarantee that it won't ever be able to run until you enable it later. Only do this if you have ample storage free on your phone.
Reset to default settings


Source: Android Central


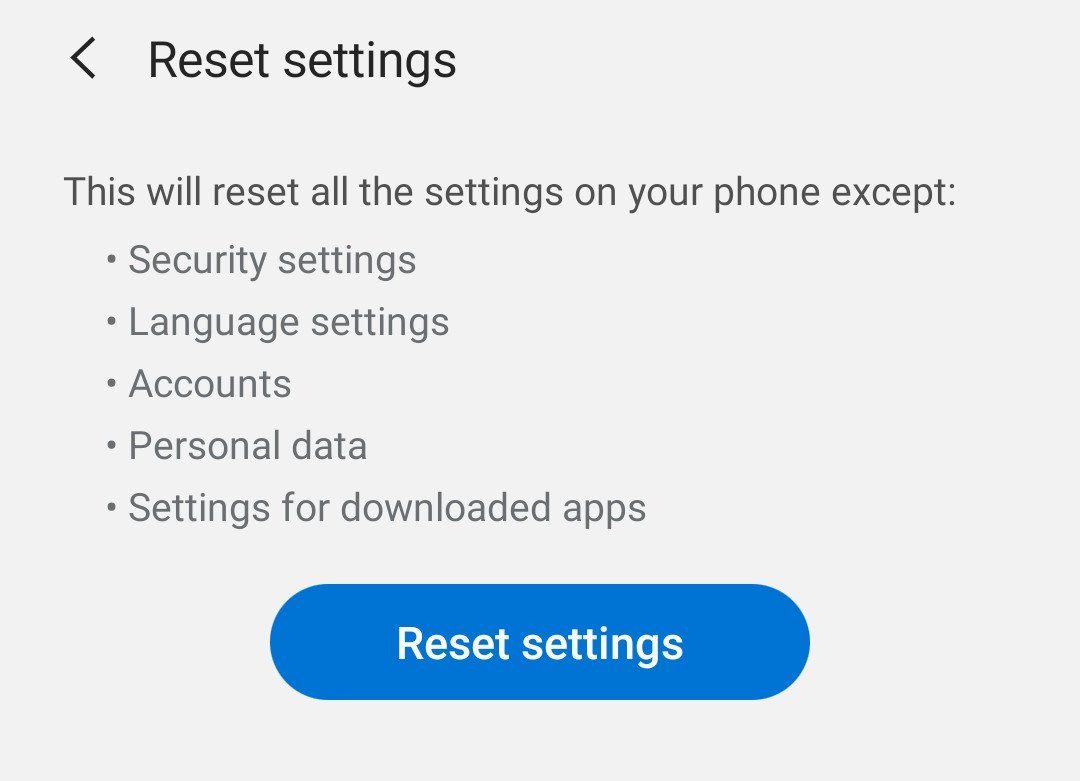
If you can't track down a specific app or other cause for your phone's slowdowns, it can be useful to just reset all settings on your phone so that it goes back to generally operating how it did when you first got it. By performing a "settings" reset, your phone will clear all of your changes made to security, language, accounts, personal data, and settings for your downloaded apps (like default apps, etc.).

To do a settings reset, go to settings, general management, reset and tap on reset settings. To be clear, this will not delete your apps or app data, so you won't have to reinstall anything or sign back into your apps. However, it will delete quite a bit of the tweaks that you've made over months and years using your phone. Things will go back to a relatively blank slate, but you avoid the hassle of having to backup and restore all of your apps and data. This is a good compromise.
Factory reset


Source: Android Central


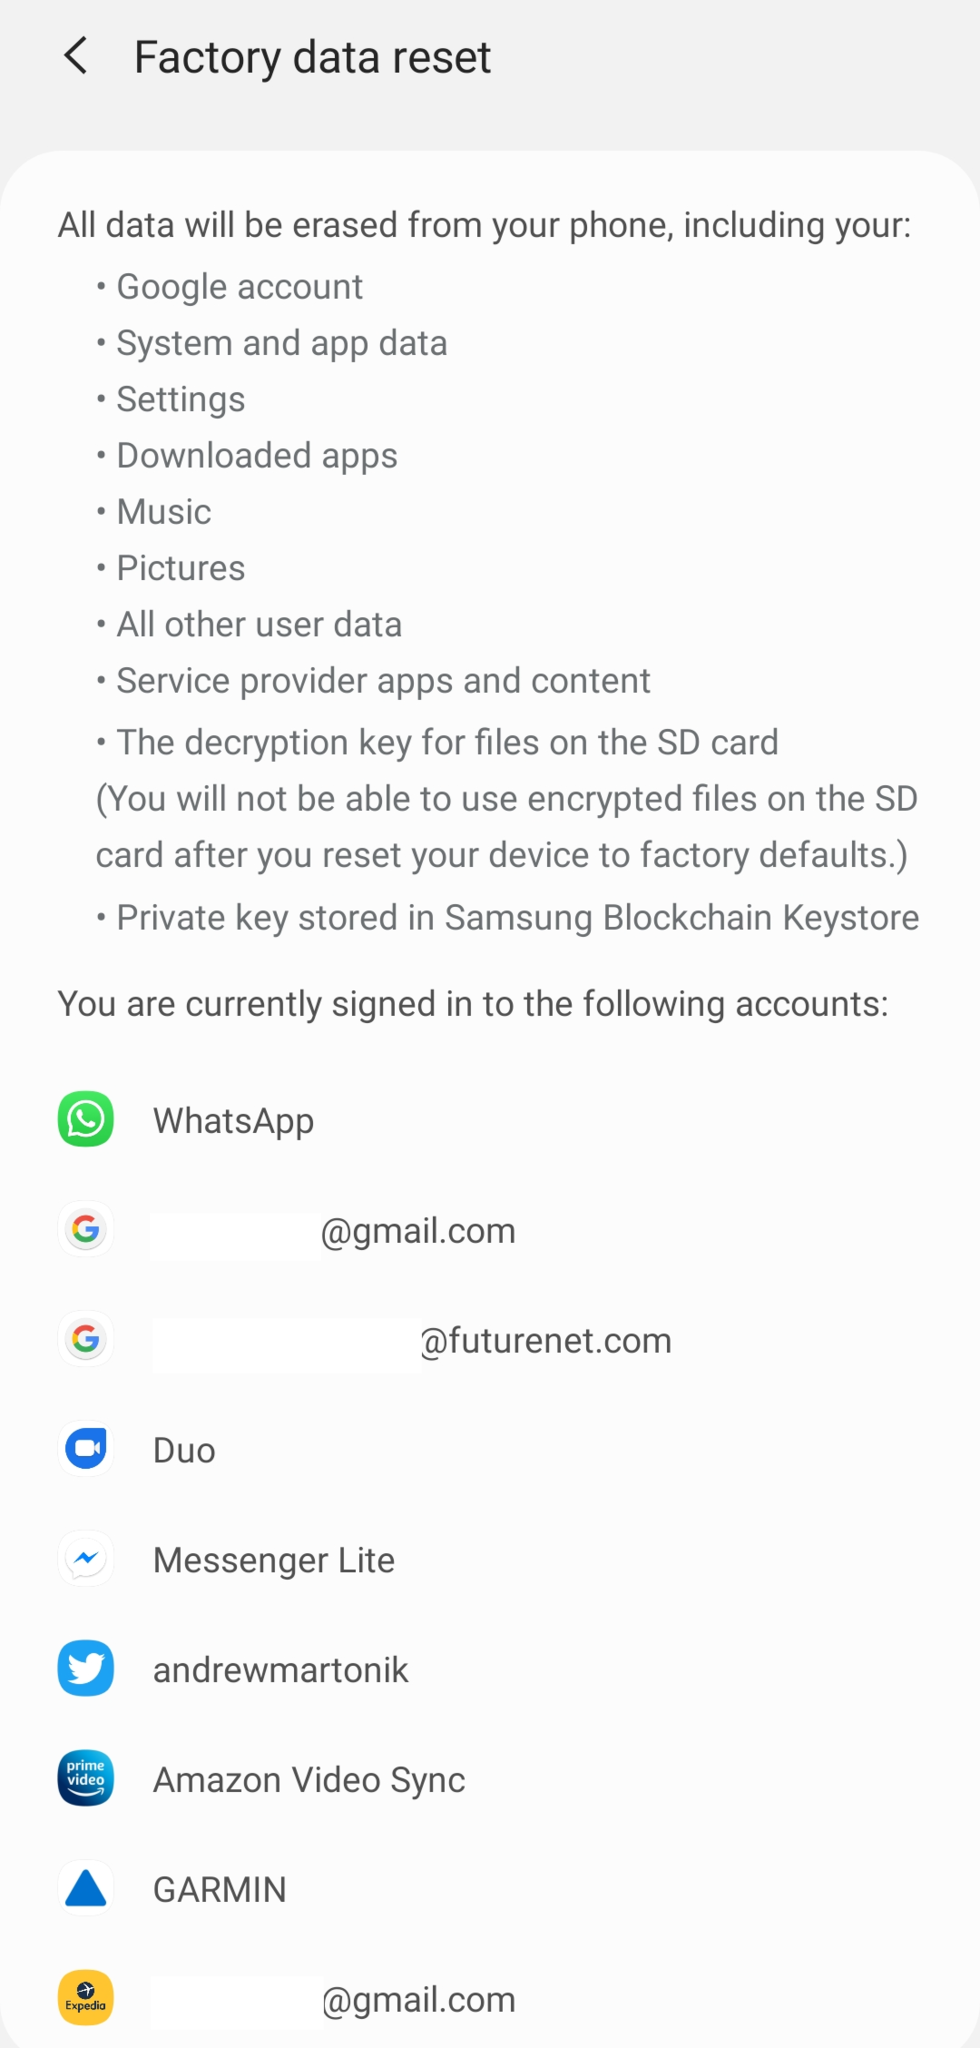
When all else fails, and you just can't track down the source(s) of your phone's slowdowns, the final step is to perform a factory reset. This will blow away all of your customizations, apps and data, and start over fresh just like the phone came out of the box. It's the nuclear option.

Before you go any further, make sure you back up all of your data. A factory reset will delete everything, and you don't want to lose it permanently! We have a complete guide on backing up your Android phone, which can help you make sure that all of your important data is safe and ready to be restored back to your phone after resetting.

Once you're certain you have all of your important data backed up, go back into the reset settings and tap factory data reset. The phone will remind you of everything that's being deleted, and the accounts that are being removed. You also may have to confirm your Samsung Account password. Then, confirm once again and your phone will factory reset automatically. It will restart, take a couple of minutes to delete, and restart once again — when it comes back, it will be brand new.